NOTE: This post was moved to Back to the Drafting Board [drafting.aspaceintime.com] Future tips & how-to articles will be found there.
This post is the first of an ongoing series of tips and how-to articles for AutoCAD and Architectural Desktop. If you would like to make a request, or have a question about any of these articles, post a comment here or send an email to tips(at)aspaceintime.com.
This tip was originally in response to a posting in the AUGI forums by Marv Muston of Orlando, FL. I ran across a post in which Marv asked how to make a niche in a wall entity in Architectural Desktop (ADT). In other words, how does one make an recess in a wall, with no "thru-the-wall penetration," as he put it. He was trying to make a shelf within the wall, which is a common architectural element, so this is a good question. After posting my suggestion of using a "chase" symbol, I got the feeling from the forums that these symbols were fairly unknown, so I thought I'd expand this tip to an actual "how-to," showing step-by-step how to accomplish this.
Well, like so many other things in AutoCAD, there are many different ways you could make a niche. The most precise, yet most complicated way is to use body modifiers [command: WALLBODY] to attach mass elements to the wall, then specify either a subtractive or additive state. This truly is the most precise way to get the wall entity to look exactly the way you want, but if you are dealing with a wall style with multiple components, this can get to be a very tedious maneuver, as each component needs it's own additive or subtractive element attached to it. One major disadvantage of this is if you change the wall length, you (probably) will also have to update the modifiers manually; the other disadvantage of this is you usually need to customize the display properties of the wall as well, to get it to look the way you want in the plan view.
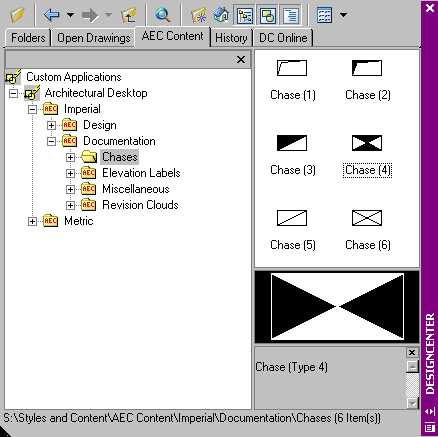
So, a nice and easy alternative is to use a "chase," which is a multi-view block, with some extra properties, namely it's very own body modifier, built right in! More on that in a minute... You can find six different styles of chases in the Design Center, in their own folder (called "chases"), under the "Documentation" section of the AEC Content tab.

The only difference between them is the plan view, which you can see in the preview, as well as the icons. There is no elevation or 3D element to these, so you will only see the 2D symbol in the plan view. [BTW: the path shown at the bottom of the image (above) will be different on your own system, as I have mine mapped through a network drive "S:"] Now that you know where to find them, all you have to do is click and drag them into your drawing. Lets go through the steps...

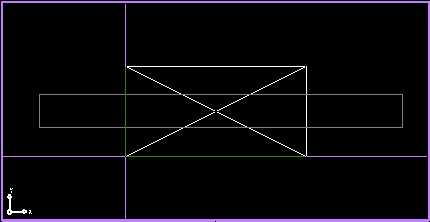
Here I have a standard wall in which we're going to make a niche. The top shows the plan view, and the bottom shows both faces, or sides, of the wall in hidden views. We pick a chase from the Design Center and drag it into the drawing. You are asked to specify an insertion point.

I generally pick somewhere that places the symbol over the wall. When we click, the following dialog box appears:

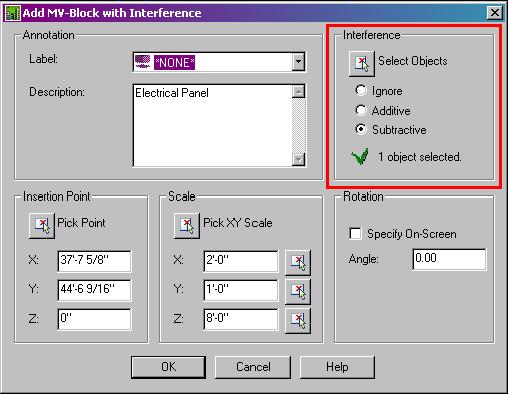
Here you see those special properties I was talking about. In addition to the standard settings of location (Insertion Point), size (Scale) and angle (Rotation), you are given options for a Description (in this case "Electrical Panel" which is one of the things I use chases for), setting a Label (such as an item number callout), and setting an Interference condition. This last item is the most important for what we're trying to do.
Click the Select Objects button, then click on the wall you're placing the chase into. The dialog box will come back and you'll now have the option to choose Additive, Subtractive or Ignore.

We want to set it to Subtractive; this will make a hole in the wall. If you know the dimensions of your niche and where you want to locate it within the wall, this would be a good time to change the other settings, but for now, click Ok, so we can see how the chase works.

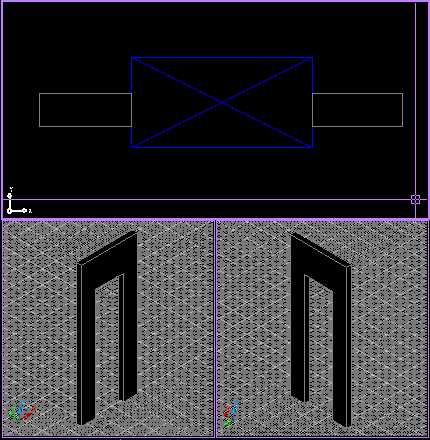
Now we have a chase symbol in our wall. Notice in the plan view that the wall gets "cut" where the symbol is; plus, in the 3D views, we have a opening in the wall.
I know, you're saying, "I could have used an opening to do this," and you are correct; but, we're not done yet. We need to change the size and location of the chase; right now it's a 2'-0" wide, 1'-0" deep by 8'-0" high chase sitting on the floor (zero 'Z' coordinate). What we want to do is make it narrower than the wall and somewhere up in the wall. First, select the chase and open the Properties dialog (or just go to the Properties Palette).

Since the wall in this case is 4 1/2" wide, we want to change the Scale to have an 'Y' value less than that, say 4". Additionally, since this is an "Electrical Panel," we want to change the 'X' and 'Z' values to something more realistic, like 18" wide and 36" high. To get it off the floor, we then need to change the Elevation value, to like 4'-0". The properties should now look like this:

...and the drawing should now look like this:

Okay, so my aim wasn't real good. But you'll notice in the plan view that the symbol still cuts the wall, but now the "below cut plane" part of the wall is also showing (magenta, in this case). Plus, in the 3D views, there's no longer a hole, but a recess on only one side of the wall. We're almost there. Now it's just a matter of moving the chase symbol into place, and that's as easy as using the move command or using the symbol's node, whatever your preference.

That's better. Now we have a well placed niche in one side of the wall. Just be careful when moving the chase symbol using object snaps, as you could force the elevation back to 0" by snapping to the wall in the plan view. If you would like to play with this example, you can download the drawing file by clicking the box.net button below.

Let me know if you found this tip helpful by posting a comment. I hope to continue posting tips, but I'd like to know (1) I have an audience and (2) what you might be interested in me showing you.